
Revvi Bike Ultimate Maintenance Guide
A regular maintenance routine is the best way to extend the life of your child's electric balance bike and ensure it performs at its best. This comprehensive Revvi bike maintenance guide has been designed to be clearer and more practical than the original owner's manual, with straightforward instructions and real photos to help you through each task.
Whether you're a parent with no prior mechanical knowledge or a confident DIYer, this guide will walk you through all the essential checks and adjustments to keep your Revvi bike safe, reliable, and fun to ride. For more info on buying a Revvi bike please see our buying guide.
If you are interested in Revvi bike racing and competing in events like the Revvi Cup see our guide to the sport here in the Ultimate Guide to Revvi Bike Racing.
Chain Tension
Maintaining correct chain tension is critical for safe and smooth operation. An overly loose chain can slip or derail, while one that’s too tight can cause unnecessary wear on the motor and drivetrain.
How to Check and Adjust:
-
Start by placing the bike on a stable surface or work stand.
-
Loosen the rear axle nuts and the bolt securing the rear drum brake.
-
On both sides of the rear axle, locate the chain adjuster nuts.
- Turn these evenly to move the wheel back, taking up any slack in the chain.
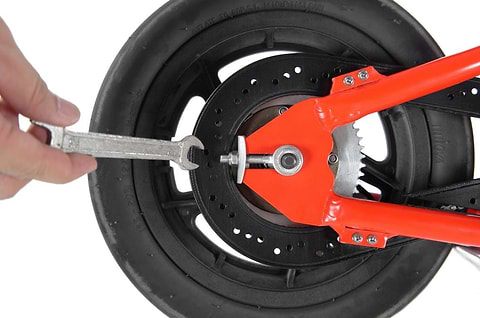
Tip: A properly adjusted chain should have around 10–15mm of vertical movement when gently pressed in the middle.
After tensioning:
-
Retighten both axle nuts securely.
-
Re-fasten the brake mount bolt.
Keeping the chain tensioned correctly is one of the most important Revvi bike maintenance steps you can learn, and it's quick once you’ve done it a few times.
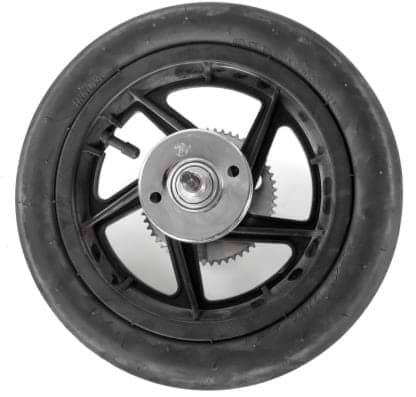
Wheel Lock Nuts
The wheel lock nuts secure the wheels to the axle and must be tight to prevent wobble or lateral movement.
How to Check:
-
Try rocking the wheels side to side by hand.
-
If there's any movement, use a spanner to snugly tighten the nuts.
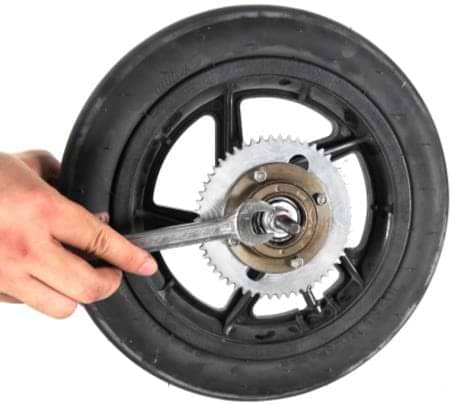
Loose wheels can affect the bike's balance and stability. Include this in your daily Revvi maintenance checks, especially after transporting or storing the bike.
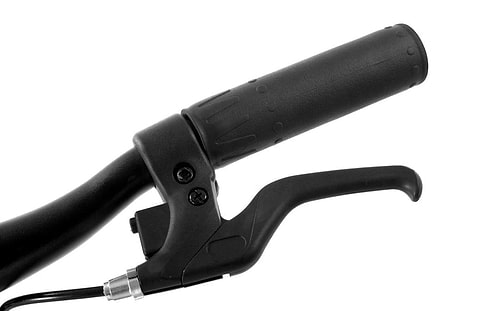
Brake System Maintenance
Effective brakes are vital for rider safety. Regularly checking and adjusting the braking system is a key part of routine Revvi bike maintenance.
Daily Brake Check:
-
Squeeze the brake lever firmly.
-
Ensure the brake engages quickly and stops the wheel fully.
-
If the lever feels spongy or the stopping power is weak, it’s time for an adjustment.

Adjustment Options:
-
Brake Cable Adjuster: Located where the brake cable enters the lever or caliper. Turn it to increase or decrease tension.
-
Brake Nut: Fine-tune cable tension near the drum.
-
Pad Inspection: Visually check pad wear. If the friction material is thin or uneven, replace the pads promptly.
Rear Pad Adjustment
Rear braking performance can suffer as the pads wear or shift slightly out of place.
To Adjust:
-
Locate and loosen the small grub screw near the rear drum brake.
-
Gently reposition the brake pad to improve contact with the brake surface.
-
Retighten the screw securely.
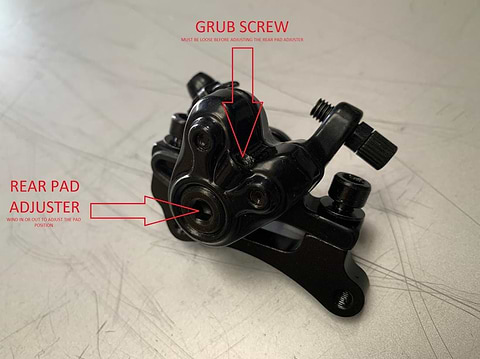
Including this adjustment as part of your monthly Revvi bike maintenance routine can prevent long-term brake wear and maintain performance.
Brake Lever Fine-Tuning
If your child finds the brake lever uncomfortable or unresponsive, adjust the feel by tweaking the cable tension at the lever.
-
Locate the adjustment nut near the brake lever.
-
Turn it incrementally to either tighten or loosen the lever feel based on rider preference.
This small tweak can significantly improve control and rider confidence.
Battery Charging and Safety
Your Revvi’s lithium-ion battery requires proper handling and regular charging to maintain capacity and safety.
How to Charge:
-
Remove the protection plate and open the battery compartment.
-
Insert the charger’s DC head into the battery port.
-
Plug the charger into a wall socket.
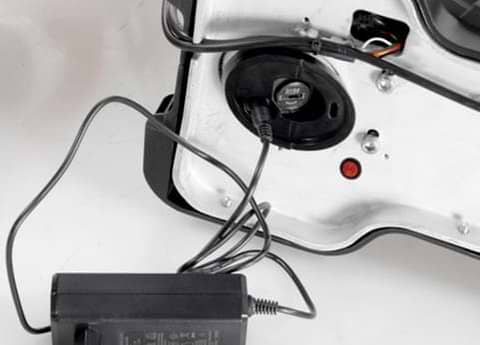
Indicator Lights:
-
Red: Charging
-
Green: Fully charged
Safety Guidelines:
-
Never charge the bike in damp or outdoor areas.
-
Avoid exposing the charger or battery to impacts, drops, or excessive heat.
-
Always supervise the charging process.
-
Only use the original Revvi charger to prevent fire risk or battery damage.
Consistent battery care is central to long-term Revvi bike maintenance, and poor charging habits are one of the most common causes of battery failure.
Seat Height Adjustment
Revvi bikes feature a quick-release seat clamp, making seat height adjustment simple and tool-free.
-
Open the clamp to adjust the seat post.
-
Set the seat height so the rider can place both feet flat on the ground while seated.
-
Ensure the post does not extend above the marked safety line.
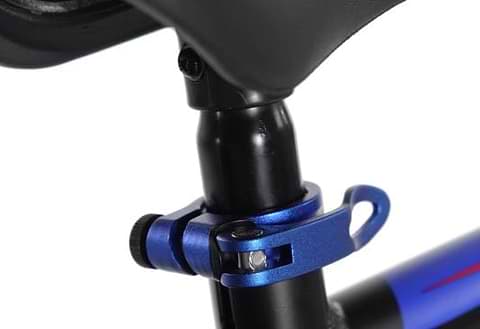
Proper seat height contributes to safe, confident riding and should be checked as your child grows.
Handlebar Height Adjustment
Handlebar position is adjusted using the included 10mm headstock spacers.
-
Use the spacers to raise or lower the handlebar to suit the rider's comfort.
-
Always double-check that the handlebar clamp bolts are securely tightened before each ride.
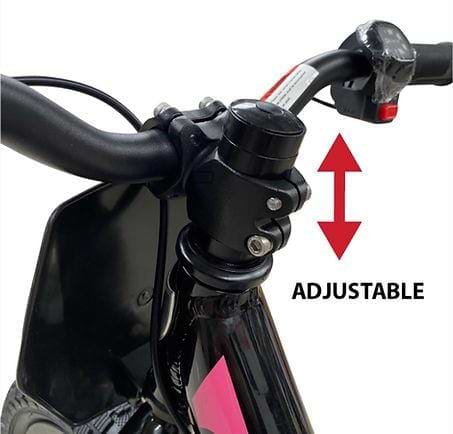
This adjustment may only need to be done occasionally, but it’s essential for proper control.
Maintenance Schedule
Use this checklist to keep your Revvi bike maintenance on track. Regular attention will help prevent issues and extend the life of your bike.
|
Component |
Check Frequency |
Notes |
|
Headset Bearings |
Once per year |
Clean and apply grease |
|
Axles (Front/Rear) |
Once per year |
Remove, grease, and reassemble |
|
Chain |
Weekly / After Wet Rides |
Lubricate with quality chain oil |
|
Battery |
After Every Ride |
Recharge regularly; don’t allow full discharge |
|
Tyres |
Before Every Ride |
Inflate to 20 psi; inspect for debris or damage |
|
Brakes & Pads |
Before Every Ride |
Test braking power; replace worn pads |
|
Wheel Nuts |
Before Every Ride |
Confirm tightness by hand |
|
Bolts/Nuts Overall |
Monthly |
Check tightness across the entire bike |
|
Forks |
Monthly |
Wipe clean; apply light grease if needed |
We hope you found this guide useful. For more information on Revvi bikes please see our Ultimate Revvi Bike Buying Guide.
